Last updated May 14, 2023.
Continued from Part 4: Mod Installation Best Practices, or start at the beginning with Basic Morrowind Installation.
First things first, if you’re not using MO2 and you have both the Morrowind Code Patch and MGE XE successfully installed, back up your Morrowind folder again. The entire Morrowind folder.
Now that we’ve established some good habits for organizing your Morrowind directory, it’s time to install your very first Morrowind addons — or at least the first that are actually regular addons and not a whole separate program.
If you were following my Using Mod Organizer 2 with Morrowind – Tutorial, you will have already installed the mods in this guide entry, but you can still read this to learn more. Just keep in mind that all your load order organizations will be done through MO2, not via other methods described here.
Improving Fidelity of the Vanilla Graphics
Later in this guide, I’ll discuss high-definition graphics for Morrowind as an optional step for those who desire them. But even if you have no interest in “updating” the graphics beyond MGE XE (or you haven’t decided yet), there’s still one mod you should consider, simply because it improves graphical fidelity without upscaling anything at all. It’ll basically make the game look “the same, but better.”
Morrowind’s original textures may be fine in your eyes, but they’ve still been highly compressed, so they don’t look as good as they could. Playable Uncompressed Vanilla Textures Replacer provides exactly what it says: uncompressed versions of the original textures. They are exactly the same as the ones in the base game, except being uncompressed means that artifacts and other issues are gone. Even if you never install another texture mod as long as you live, you’ll appreciate this one — the differences can be small, but noticeable on modern computers.
Download the mod, selecting the one from “MAIN FILES.” If you’re installing manually, choose “MANUAL DOWNLOAD.” If you’re using MO2, specific instructions for downloading and installing this are found in my MO2 tutorial. The instructions below are for a manual installation.
Your download will consist of an archive which you will extract to find a Textures folder. Simply drop that folder into your Data Files.
If you’re at all familiar with modding Morrowind, you may wonder why I’m recommending you install this now instead of later when we look at other texture packs. There are a few reasons for this. First, these are strictly vanilla textures, exactly the same as the originals but clearer. This means they are simply a base, and some of them are going to be replaced by the very next mod you install (which will fix errors in the ones it replaces) so placing this mod here in your installation order is the most convenient. Also, having these textures in your game will help you decide whether or not you really need a high-definition texture pack later.
If you are already planning to use other texture replacers, including any high-definition ones I cover later, you might wonder if you still need this. The answer is that you may not. But getting the graphics to this level of improvement will help you decide whether you need an HD replacer at all. If you do decide to use HD textures, you’ll be replacing this mod. If you’re doing a manual installation you’ll just be copying over its files anyway, so you won’t even need to delete it first. In MO2, you can choose to delete it through there once you see that everything in it is being overwritten by something else.
So, there’s no harm in installing this even if you end up overwriting most of it later. These days, I consider this mod a necessary baseline patch along the lines of bug fixes rather than a graphical “upgrade” even though it does improve the graphics.
Now let’s fix some bugs!
Patching Bugs that Remain in the Game
The purpose of this next addon is to fix countless in-game bugs that Bethesda overlooked in their official patches. This will be Patch for Purists. Don’t get it mixed up with the Morrowind Code Patch that we installed in a previous entry; that was a program to fix things that addons couldn’t, whereas now we are working with a traditional addon.
Note: Why Patch for Purists and Not the Morrowind Patch Project?
In case you’re a new modder finding conflicting information everywhere, or an old modder coming back to Morrowind in confusion at how things have changed, a bit of explanation is in order: the Morrowind Patch Project (MPP, also formerly known as the Unofficial Morrowind Patch or UMP) is an older addon with a similar purpose to Patch for Purists (PfP), and has been a staple of modding guides for a very long time. I used to recommend the MPP in this guide, but I’ve switched to PfP for several reasons. I’ve had my eye on PfP for several years, watching it develop into a comprehensive and carefully built project that I feel should replace the MPP in almost everyone’s load order.
PfP describes itself as taking “a more conservative approach about what it considers a ‘bug,'” meaning it excludes more subjective changes (like altering character classes) in favor of sticking closely to the original game while fixing as many bugs as possible. Patch for Purists is the best option for a new player who wants to experience Morrowind as it was intended. I’ve been playing the game with PfP in preparation for this guide update and it absolutely preserves the Morrowind “flavor” better than MPP did, at least in my opinion — I’ve never once felt its presence the way I used to feel MPP’s during the years I used it, in the sense of “is this Morrowind or is it the patch?” which I used to wonder all the time with MPP. This also means that information found on the UESP Wiki will be more consistent with what you see in-game, as opposed to certain changes made by MPP.
Besides that, PfP also includes fixes for several other issues that previously required additional installations (like certain mesh fixes that I’ve now been able to remove from later steps in the guide), meaning there’s less for you to download and install before you can start playing. PfP is also much more actively developed than the MPP. For all these reasons, I consider Patch for Purists a worthy successor and replacement for the Morrowind Patch Project. None of this is meant by any means to disrespect the incredible amount of work that’s gone into the MPP over the many years it’s been in development — Morrowind wouldn’t be what it is today without the MPP. It’s simply that, in addition to the other reasons I’ve given, this guide is meant to be purist-friendly and I’ve found PfP to live up to its name very well.
If you’ve been modding Morrowind for a while, or following my guide since I first started it in 2014, you may very well be used to the MPP and prefer it. If you want to stick with MPP, there are a few things you need to know first:
- The MPP used to be hosted on The Assimilation Lab, which has since been taken down.
- The MPP is being continued on AFK Mods, and has been renamed back to Unofficial Morrowind Patch. You can find it here (I’ve linked to its forum thread rather than straight to the download page, as you may want to keep updated on its progress). You will need to create an account on AFK Mods to download it, but you can read the forum thread without an account.
- The rest of this guide is going to assume you are using Patch for Purists, and I do highly recommend you make the switch. I’ve also removed the script-improving addons (GOTY Script Tidy and Script Improvements) from the guide because they are not recommended for use with PfP. Later steps in the guide will also have all the various fixes removed that once needed to be installed separately but are now included in PfP.
If you want to follow the older version of my instructions, each page is saved on web.archive.org (for example, this very entry with all the old MPP info) but many of the links may be broken now, especially with long-term resources like The Assimilation Lab going down (and I obviously can’t fix links on a Wayback Machine version of a page). The current version of the MPP/UMP is described and linked above, so you no longer need to follow the exact instructions from the old version of the post, but it’s there for historical purposes (and in case you’re a long-time reader who wants to remember what you may have done before). I’ll do my best to preserve what I can, but my focus is going to be on building a mod loadout based on Patch for Purists and it may become impossible to support MPP users at the same time. I am open to suggestions.
Installing Patch for Purists
Download the main file of Patch for Purists. For MO2, this mod is also installed during my MO2 tutorial so those are the instructions you should follow if you are using MO2. The following instructions are for a manual installation.
Open the Patch for Purists archive. You’ll see a few folders like BookArt, Icons, etc. and some .esp files along with the main .esm. Put all of these into your Morrowind\Data Files folder and allow overwrites when asked. The folder called “Docs” contains the documentation for Patch for Purists; if you’re installing manually, I recommend renaming the Docs folder to “Patch for Purists Docs” and moving it into the folder you made to collect all your readmes in the previous step of this guide (you did do that, didn’t you?).
The folders (besides “Docs”) are the assets Patch for Purists will use to fix some of the graphics-based bugs in Morrowind. The Patch for Purists.esm file is the main patch plugin which will apply the fixes. The other two, Patch for Purists – Book Typos.ESP and Patch for Purists – Semi-Purist Fixes.ESP, are both optional and contain other fixes that some people prefer not to use (which is why they’re separate). It breaks down like this:
- Patch for Purists.esm – Contains all the bug fixes. You need this.
- Patch for Purists – Semi-Purist Fixes.ESP – This was formerly called “Patch for Purists – Decimal Errors.ESP.” It makes some changes to various numbers that seemed to have been overlooked during Morrowind’s development, e.g. the weights or enchantment values of certain items being inconsistent with similar ones. It also does some other minor things that are a bit too subjective to be placed in the main mod (read its readme for a list). I personally prefer these changes, so I use and recommend this. You’re free to ignore it, though, especially if you don’t like certain changes it makes. Just check the readme before you install it.
- Patch for Purists – Book Typos.ESP – Fixes typos within the in-game books. This is optional because some people feel that any book typos are fine to leave intact, since real-life books also include typos (as a professional editor, I’d say this happens far more than I’d like), or maybe the Elder Scrolls character that wrote the book made the typo. It’s up to you whether or not you use it. I usually don’t use it myself, for the weird reason that I’m actually used to the typos in Morrowind books and it feels weird when a familiar error isn’t there (nostalgia is so misplaced sometimes), and also to ensure maximum compatibility with anything else I might want to install later that also alters books.
Now we’re going to make sure these mods load properly in the game, with everything in the right order.
Understanding Load Order
Load order is one of the most important things you can learn about when it comes to modding Morrowind, and now is the time. In Morrowind, plugin files load from oldest to newest, and if any two addons modify the same in-game asset, only the later addon’s changes will apply and the earlier addon will be overwritten. It will become very important to sort your loading list properly (and to learn how to merge or patch mods so changes from more than one will take effect, which I cover later), and there are many fine tools available to accomplish both of these things. However, we’re trying to keep it as simple as possible for the time being, so right now we’re only going to address one particular problem. We need Morrowind, Tribunal, Bloodmoon, and the addons we just installed to load in the following order:
- Morrowind.esm
- Tribunal.esm
- Bloodmoon.esm
- Patch for Purists.esm
- For the last two (the optional .esp files Patch for Purists – Book Typos.ESP and Patch for Purists – Semi-Purist Fixes.ESP), it doesn’t matter which loads first
(You may wonder why you don’t see Playable Uncompressed Vanilla Textures Replacer anywhere here. That’s because it has no .esm or .esp plugin file, it’s just a Textures folder, so you’ve already ensured its proper load order by installing it first.)
The only way to get these files to load in the proper order is to make sure the actual file dates put them in that order. Master files (.esm) always load before .esp files, but they still need to be ordered correctly. Morrowind stores its original assets (graphics, sounds, etc.) in .bsa files, which also need to load first so they can be overwritten by assets included with mods.
File dates are a frequent source of trouble for beginning modders working with a Steam installation, namely because the dating of Steam’s Morrowind files makes it impossible for mods to affect them. Why is this? Well, Morrowind’s three .bsa files need to be older than the mods, and in the Steam version, the .bsa files have dates that are too new. In fact, they are newer than many of the mods we’ll be using, so they’d load last, and not be properly overwritten! Luckily, starting with version 2.3 of the Morrowind Code patch, you no longer need to redate the .bsa files on your own because the MCP will now automatically redate them to their original release date (circa 2002 – 2004), which will allow all mods to overwrite them as normal.
Now, while it’s very nice that the Morrowind Code Patch redates the .bsa (game asset) files to allow them to be overwritten by mods, it doesn’t redate the actual game .esm files. We need to sort them into the proper load order ourselves so Patch for Purists doesn’t load first (it comes with a date in 2004).
There are a few ways you can sort your load order.
Sorting Your Load Order with Mod Organizer 2
If you came here from my Using Mod Organizer 2 with Morrowind – Tutorial, you already know how to sort your load order in MO2. You just drag and drop the mods into the correct order and make sure their order is the same in both the left and right panes (specifically, the “Plugins” tab of the right pane) of the main MO2 window.
This also means you will not have to sort your order by any of the other methods below. You will eventually use Wrye Mash for other things, but the load order is taken care of in MO2, and you shouldn’t mess with it in Wrye Mash. Don’t rearrange your load order with any of the other methods on this page. Keep it MO2-only, and don’t click on “Data Files” in the original Morrowind launcher (in fact, you shouldn’t be opening the original launcher at all anymore since you’re using MO2 to run the game).
You can actually scroll past all this down to the “Loading Addons” section, and to be fair, you can skip most of that too.
Sorting Your Load Order with Wrye Mash
If you’re not using MO2, the absolute best method for sorting Morrowind files is to use Wrye Mash, a program specifically for handling and fixing Morrowind mods and savegames. I will explain how to install Wrye Mash in the next entry of this guide, but for now you can just take a look at what you can expect it to do regarding your load order. (Or, you can visit the next entry, install it, and then come back here.)
When it’s done with setup and starts up all the way, you’ll see a window listing your installed mods. They’ll be in weird order and probably highlighted with different colors. The colors illustrate which mods are trying to load before their own master files (the files they rely on being present and loading first), with mods with this problem shown in red. Simply drag and drop the mods in the list to be in the order you see below, which will change their coloration to the nice green that means all is well. The displayed file dates may still look wrong, but it’s nothing to worry about. Once you have the mods in the right order, check the boxes for the ones you want to load into your game. You’ll need at least the three main game files and the main PfP file, plus any of its optional .esps that you want to use.
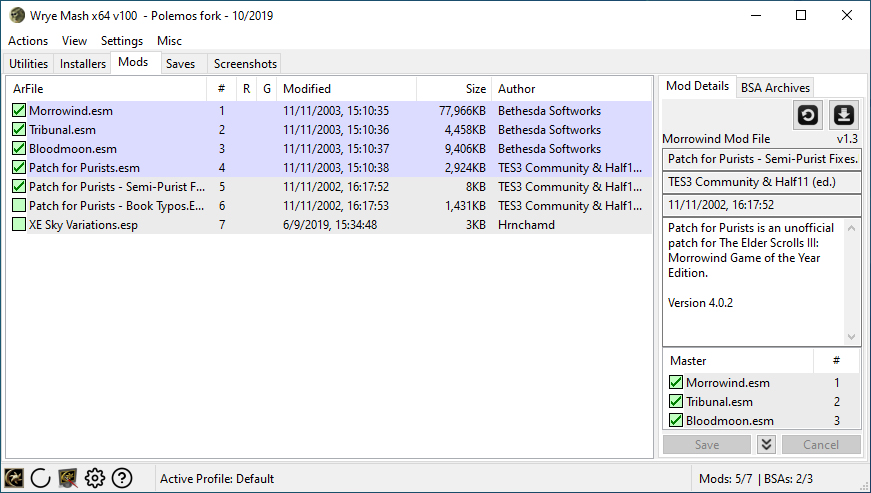
Like I said before, Patch for Purists – Book Typos.ESP and Patch for Purists – Semi-Purist Fixes.ESP can be in either order. I just put Book Typos after because I’m not using it and I feel it looks more organized this way. It doesn’t matter if you do this, as unchecked mods won’t load up at all, so it doesn’t matter where you keep them. Just move them to the right place in your load order if you do start using them.
You may also notice that I forgot to delete XE Sky Variations.esp. Oops!
Reminder: If you’re using MO2, you can sort your load order by drag-and-drop the same way as you can in Wrye Mash. Just pay attention to both the left- and right-hand panes in MO2 and don’t change the load order in Wrye Mash.
So, if you’re using Mod Organizer 2 you won’t need Wrye Mash just to adjust your load order (since that’s one of the main features of MO2), but there are still other features of Wrye Mash you will want to use with MO2. In order to do so, you’ll need to register the Wrye Mash executable in MO2. Instructions for that are on my Using Mod Organizer 2 with Morrowind – Tutorial (and if you followed that to the end, you’ve already done this anyway).
Keep in mind that if you’re using MO2, you’ll have to run Wrye Mash through MO2 or it won’t see your mods. The same goes for every other program that can be run through MO2.
Sorting Your Load Order Manually by Re-Dating Files
If you’re not using MO2 and Wrye Mash is still too intimidating at the moment, you can also manually change file dates with some basic, free utilities. Personally, I used to use Attribute Changer (I already had it on my computer for a different project), but be careful when downloading and installing because now it’s packed with optional “offers.” If you dislike the risk or just want a smaller, more specialized program, try SetFileDate 2.0. Another option is SKTimeStamp which you may prefer (and it’s the one I’m using on my current computer).
Once you have your chosen utility, just redate each of the original three .esm files to match the dates on their corresponding .bsa files. Then you’re good to go.
If you are using one of the above methods, there’s no reason to redate your files this way. It’s kind of a last resort.
Loading Addons in the Default Morrowind Launcher
Any addon with .esp or .esm files needs to be activated in order to affect your game. Mod Organizer 2 handles this if you’re using it, and Wrye Mash can also manage your active plugins in the exact screen you saw above. But if you want to stick to the basics for now, I’m going to show you the default method.
Please note, however, that if you start managing your load order in MO2 or Wrye Mash, you don’t need to do this and you should AVOID clicking “Data Files” in the Morrowind launcher because it can shift your load order around and undo your work. But I’m going to show you what it looks like anyway, in case you’re running a purely manual installation and don’t have Wrye Mash yet.
To make sure an addon is loaded into your game, insert your Morrowind disc (if you’re using CDs) or open the launcher. You’ll see this:
AAAAH IT’S A BEAR and a… uh…. ah… a dinosaur that is compensating for something?
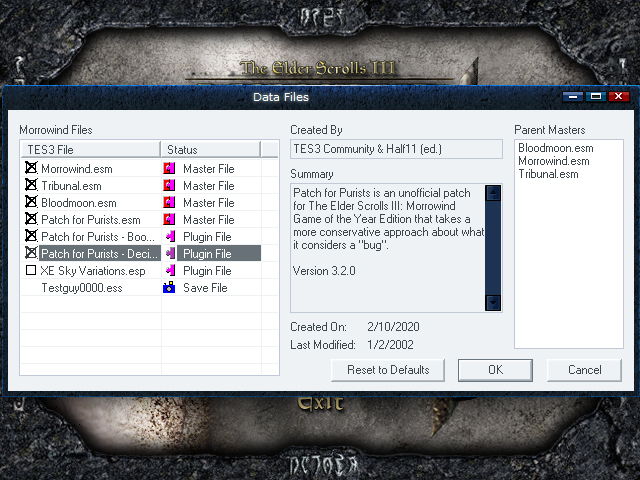
Click “Data Files.” Then you’ll see something similar to the below image, except some of the boxes won’t be marked. Double-click the box next to the Patch for Purists .esm and any of its optional .esps you want to use. Ignore XE Sky Variations for now, if it’s still there (you may have deleted it; it came with MGE XE). (Also ignore “Testguy0000.ess” in the screenshot; that’s a savegame I made to test while modding.)
 Now, later on, we’ll be managing addons differently because you will want Wrye Mash at some point, but the default tools are enough right now if you’ve chosen not to use MO2 and have yet to install Wrye Mash. Once everything except XE Sky Variations (and either optional Patch for Purists .esp you prefer not to use) is activated with an X, click OK. You cannot drag and drop mods into a different order here — that’s one of the advantages of using Wrye Mash or MO2. If you’re determined to play without Wrye Mash at the very least, you’re going to be stuck redating your files manually as described earlier.
But What if I’m Using MO2?
If you’re using MO2 and you installed Patch for Purists through it, and you opened the default launcher above even though I told you not to, you won’t see Patch for Purists in the list of mods. Don’t panic, this is normal!
Since MO2 uses a virtual directory structure, mods are kept in their own folders and don’t add anything to your Data Files. So, Morrowind won’t see them if you launch it through the plain old launcher above. In fact, none of the mods you install through MO2 will affect your game in any way unless you actually launch Morrowind through MO2. If you’re using MO2, always launch Morrowind through it, and make sure you’re launching the game itself, not the Morrowind Launcher (I heard you like launchers so I put a launcher in your launcher). If you launch Morrowind through MO2 then all your mods will be visible to the game whether you installed them through MO2 or not (although anything not installed through MO2 will appear in MO2’s list as “unmanaged”). Also, “launch” doesn’t even look like a word anymore.
A Note About Errors
Now, regardless of which method you’re using, when you start the game, you may (read: you probably will, especially once we start adding more mods) see an error that reads “One or more plugins could not find the correct versions of the master files they depend on. Errors may occur during load or game play. Check the “Warnings.txt” file for more information. Continue running executable?” This is a harmless error that in 99% of cases affects nothing, so just click “Yes” or the “Yes to all” button you may have activated in MGE XE. We can get rid of this error later, too.
Now, regardless of how you actually sorted your load order and launched the game, you might want to play for a bit (but not too far — trust me, once we’re all modded up you’ll need to start over). See if anything is obviously broken, and just take a break from this technical stuff. But like I said, don’t go too far; we are still in the early modding stages and your test character will not survive.
Before you do too much playing, you should continue to Part 6: Dirty Mods and How to Clean Them and learn how to fix a few critical errors BEFORE they happen!

1 ping